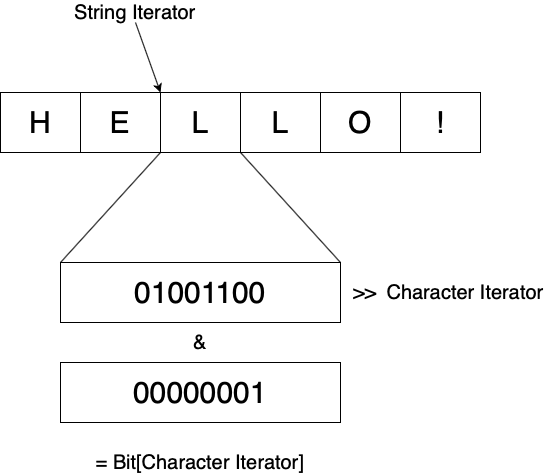
With the knowledge and proof of concept gained from last week’s work, I finally set about actually implementing part of my steganography tool. This week I focussed on the write feature and my overall goal was to fully implement it by the end of the week. My first challenge was figuring out how to run through each individual bit of the string for encoding, to solve this I came up with a system that involved both a string iterator and a character iterator that are incremented as the writing process occurs. The basic jist of it is that the character iterator iterates through each individual bit of a character using bit shifts and once it has fully iterated through the character the string iterator is increased.
As this occurs, the program itself is iterating through each byte of the image’s bitmap, when the value of the current bit is acquired it is compared with the value of the last bit of the current bitmap byte that the program is looking at. If they are the same, nothing is done, if they are different then the byte is incremented by 1.
The program also needs to do some work in terms of formatting the string before writing, as I discussed in post 2 I intend to begin my messages with the string ‘_HSTEG’ and end them with the term ‘_ETEG’ so that my read functionality can easily identify where messages are present in images and where they end. In Python this can simply be done by these to arbitrary strings on either side of the input string.
Based on the planning I had done previously and the requirements I had set for myself, I produced the following code:
from PIL import Image
import sys

def steg_write(string, picture):
    # Load bitmap
    bitmap = picture.load()

    # Get size
    width, height = picture.size
    # Constructing string and determining whether it fits in the image
    string = '_HSTEG' + string + '_ESTEG'

    if ((len(string) * 8) / 3) > width:
        print('Message too large')
        return

    # Tracks how much of the string has been written
    string_iter = 0
    # Tracks how much of a character has been written
    char_iter = 0
    length = len(string)

    pixels_changed = 0

    for xcoor in range(0, width):
        for ycoor in range(0, height):

            # List determines how much the pixels need to be altered
            alter_by = [0,0,0]

            for byte in range(0, 3):
                if string_iter < length:
                    # Find the next bit that needs to be written
                    bit_val = (ord(string[string_iter]) >> char_iter) & 1

                    # If the bit isn't already a match, add 1
                    if (bitmap[xcoor, ycoor][byte] & 1) != bit_val:
                        alter_by[byte] = 1

                    # Increment iterators
                    char_iter = (char_iter + 1) % 8
                    if char_iter == 0:
                        string_iter += 1

            # Assign new pixel value
            bitmap[xcoor, ycoor] = (bitmap[xcoor, ycoor][0] + alter_by[0], bitmap[xcoor, ycoor][1] + alter_by[1], bitmap[xcoor, ycoor][2] + alter_by[2])

    print(pixels_changed)
    picture.save('python_output.png')


# python3 stegprogram.py [w/r] [imagepath] [message]
# Open picture
picture = Image.open(sys.argv[2]).convert('RGB')

if sys.argv[1] == 'w':
    steg_write(' '.join(sys.argv[3:]), picture)
The most notable contents of the program can be found in the steg_write function which takes the message and encodes it into the picture before saving it. The program works pretty much as I planned it out above two loops to iterate through the bitmap while keeping track of how much of the message has been written using the string and character iterators. Using this code I encoded the message ‘hello world!’ into the following image with the following results:
Before
 SHA-256: 789e7d646c51bd5ae0a9eeec2318ab9f70a4e286f069461104f52e7de7822b58
After
 SHA-256: aad59782a42d9cfa64dcfd63af03ecf439fefdb226b8b02b168b6c1b5beaac4f
(NOTE: These images were resized after being uploaded to this blog so they may not have the same hashes if downloaded, they will still have different hashes from each other though)
While the images look exactly the same, their differing hashes proved that the program had indeed changed their contents, the question now was whether or not their contents had been changed to the correct values. To answer this question I put together a small program that simply reads in the first 24 bytes in an image’s bitmap (read in the same order as the writing program) and displays the binary of each byte to the console:
from PIL import Image
import sys

# Open and load bitmap
picture = Image.open('python_output.png')
bitmap = picture.load()
# Get size
width, height = picture.size

for ycoor in range(0, 8):
    for byte in range(0, 3):
        print(bin(bitmap[0, ycoor][byte]))
Running this program on the image I had written my message to I received the following output:

Reading along the last bit of each byte in the same order as the write program (least significant bit to most) gives the binary values:
01011111 01001000 01010011
95 72 83
Which corresponds with the ASCII characters ‘_HS’, the beginning of my appended ‘_HSTEG’ message. With this I had confirmation that I had successfully implemented steganographic writing to a PNG image and thus am halfway towards completing my program. Next week I intend to implement the reading functionality and then the week after it is my goal to implement some extra features that I feel will make the program more useful and more fully rounded.